Article Science Expert

Machine learning in practice: how machine learning works in data-driven research

A step-by-step guide, with real examples, of how machine learning is used in bioinformatics and data-driven life science research.

21 June 2021

PhD student Josh Colmer shows us how machine learning works in data-driven life science research - using real, published examples.

Machine learning offers a powerful way to wrestle meaning from the petabytes of biological data being produced every day worldwide.

From automating tedious manual procedures to spotting patterns where we might never have thought possible, it is fast becoming an essential addition to the portfolio of software tools used by bioinformaticians, data scientists, and industry.


Josh Colmer


Josh Colmer, a PhD student at the Earlham Institute, is well-versed in the art of machine learning. Having already published SeedGerm, an automated platform to predict seed germination, he’s busy working on a number of other machine learning-based research software tools, with applications from genomics to modelling circadian clock functions.

If you’re a beginner to machine learning, we recommend you also read '10 things you should know about getting into machine learning' and 'Machine learning for bioinformatics, a user’s guide'.

Here, Josh follows on from those guides and takes us through two real-world examples that he has developed over the last two years.


Case Study: SeedGerm

SeedGerm is a system designed to reliably predict the probability a seed is germinating by analysing images taken during germination experiments, removing the need for manual seed scoring - a laborious and subjective process.

This example demonstrates how we can develop a machine learning methodology with images of seeds as an input and the seeds’ germination status as an output.


Seed Germ Header


Above: SeedGerm is a novel system that automates reliable, scalable and cost-effective seed phenotyping to assess seed performance.


Data

The data for this project consists of sets of images of seeds, each taken an hour apart until either all the seeds have germinated or 168 hours have passed. As well as having the image data, seed specialists manually scored each seed in every image to give us ground truth results that we could eventually compare our predictions with.


Data pre-processing

Pre-processing is a critical step for removing noise or changing the distribution or format of the data so that the patterns or relationships we are interested in are more pronounced, less noisy, or appropriate for the selected model.

The majority of the pixels in each image were background rather than seeds, so we first transformed the colour space of the images from red-green-blue (RGB) to YUV so that the seed and background pixels were linearly separable. After transforming the colour space, we used a pixel thresholding method to remove the coloured background in the images, leaving just the segmented seeds.


Feature engineering

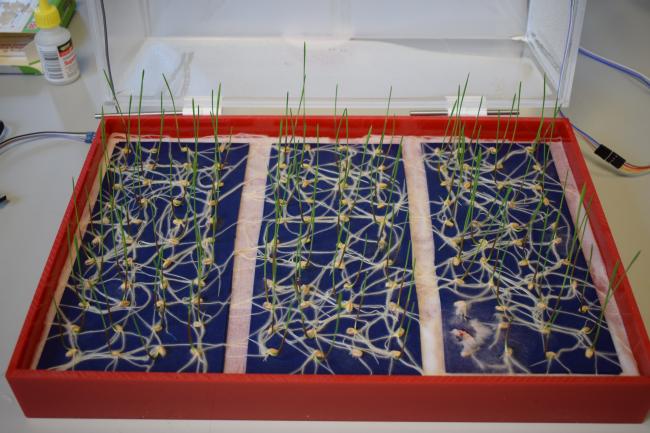
Once all seeds had been segmented in each image, we were able to engineer features using their measured morphological properties. Feature engineering allows us to transform input data, in this case an image of a seed, into features that are more predictive with respect to the target, in this case germination status.

Using several computer vision techniques, we were able to extract measurements such as the area, perimeter, circularity, and colour of each seed. Since we had a time series dataset, we were also able to infer information from previous images to calculate features such as changes in perimeter or area between images.

In this example of feature engineering, we started with a collection of arrays that represent images of seeds and generated a set of highly predictive morphological features that correlate with germination, ready to be used for model training.


Fig1SeedGermFeatureEngineering


Above: The process of transforming an image of segmented seeds into a training matrix of morphological features. Left - 9x9 grid of segmented seeds where pixels not identified as seeds are coloured as black. Middle - Example of the morphological traits measured for each seed. Right - Matrix of morphological traits produced for each seed in the dataset.


Supervised or unsupervised

As the aim of this project was to create a highly generalisable system that would function for many different crops, we decided to use an unsupervised machine learning approach. If we had used a supervised method, a model would need to have been trained for each crop and, for it to work reliably, the experimental set-up for future experiments would need to be nearly identical to the highly-specific experimental conditions the training data came from.

The main benefit of using an unsupervised approach is the model could be retrained each time and would therefore be able to deal with diverse datasets. As you’ll see in the next subsection, we technically used a semi-supervised approach (a type of learning when a small proportion of the dataset is labelled but you can use either unsupervised or supervised techniques), albeit using what is generally considered to be an unsupervised model.


Model choice

The aim of the model we chose was to classify each seed’s morphological properties as belonging to either the non-germinated or germinated class.

Due to the first 10% of images in seed germination experiments typically not containing any germinated seeds, we label all seeds in these images as belonging to the non-germinated class, giving us a partially labelled dataset to train the model.

As we will always have a small proportion of labelled data for each experiment, we chose to use a novelty-detection algorithm known as a one-class support vector machine (SVM). This model works by learning a decision boundary around the data points that lie in one class, non-germinated in our example.

When the data points (seeds) are plotted using their feature coordinates, they are classified as non-germinated if they lie within the decision boundary, whereas any data points lying outside the boundary are classified as germinated seeds.

Fig2DecisionBoundary

Above: Fitting a one-class support vector machine to the morphological measurements of seeds. Left - Decision boundary containing data points of non-germinated seeds at an early image. Right - Data points from a late image where germinated seeds lie outside the decision boundary.


Evaluating the model's performance

To evaluate the effectiveness of the model, it was insightful to compare its predictions with manual seed scoring. If the model’s predictions were able to detect seed germination accurately and robustly, the system could eliminate the need for manual scoring - providing a more cost-effective and reproducible approach to seed scoring.

The two most important qualities of the model to evaluate were whether it classified germinated seeds as having germinated and how different the predicted germination timings were to manual scoring.

SeedGerm’s predictions showed linear correlations (r) of at least 0.98 with manual seed scoring when scoring the cumulative number of seeds that had germinated in each image across five different crops (barley, Brassica, maize, pepper, tomato).


Fig3SeedGermScatter


Above: Top row - scatter graphs showing the linear correlation (r) between SeedGerm’s predictions and manual scoring. Bottom row - line graphs showing the number of seeds scored as being germinated at each image ID by SeedGerm and seed scoring experts.


Using the model in practice

As the evaluation of SeedGerm demonstrated that the predictive model’s performance was very similar to manual scores, it was successfully utilised as a research tool by Stephen Penfield’s group at the John Innes Centre to produce and phenotype large seed germination datasets.

Combining the germination trait data obtained through SeedGerm with genetic data associated with the genomic data of the Brassica varieties used in the experiments, the Penfield group performed genetic association analysis to identify regions of the genome associated with germination rate.

The region that showed the strongest association with germination rate contained at least 69 known transcribed genes - one of them being a Brassica napus orthologue of a known germination regulator.


Case Study: Circadian modelling

The circadian clock is an internal 24-hour timer that is a critical adaptation to life on Earth, regulating many physiological functions and traits associated with fitness and survival.

To advance our understanding of how stresses and environmental factors affect the clock, we developed a method to predict the endogenous circadian time of a plant using its gene expression, resulting in a set of biomarker genes for circadian time.

The aim of this project is to identify genes that can produce the most accurate predictions for circadian time whilst also being generalisable and applicable to other datasets.


Arabidopsis Thaliana52


Above: Thale cress (Arabidopsis thaliana) is a model plant often used for studying circadian clocks and rhythms.


Data

The two types of data in this project are the gene expression data and the respective sampling time (in hours). The gene expression data contains a measurement for each gene in each plant tissue sample that describes the activity of that gene in assembling proteins.

Gene expression data has high dimensionality as there are typically tens of thousands of genes in total, whereas the sample size of these datasets can be low with there only being 30 samples in our case.

Situations where the dimensionality is larger than the sample size is often referred to as ‘the curse of dimensionality’ and can lead to problems such as overfitting, as an infinite number of perfect models can be fitted to the training data but there is no guarantee the fit will perform well on test data.


Feature selection

Due to the aforementioned issues relating to dimensionality, feature selection is essential for this project. The aim of the feature selection process is to go from 30,000+ genes to a small set of rhythmic genes that are effective predictors of time. Since time is a rhythmic function, genes that produce rhythmic expression patterns will correlate strongly with our target and are desirable.

To identify which of the 30,000 genes are rhythmic, we use metrics such as autocorrelation and cross-correlation in addition to other published methods. We can rank the genes and select the most rhythmic as input data for the model by measuring the auto/cross-correlation of each gene.

We selected a set of 15 genes representing a set of diverse rhythmic patterns to be used as input data.


Fig4CircadianMethodology


Above: The ranking and selecting of genes using a selection of rhythmicity metrics. Top - methods of rhythmicity quantification. Middle - Each gene being scored using rhythmicity metrics and ranked from least to most rhythmic. Bottom - A non-rhythmic gene on the left and a rhythmic gene on the right.


Data pre-processing

The only pre-processing applied to the gene expression data is normalisation. The method of normalisation will depend on the model that is used. Most supervised machine learning models prefer for features to be on the same scale, improving convergence and preventing features being weighted differently based on their magnitudes.

Two commonly used methods of normalisation are to scale features between 0 and 1, or to “standardise” the features so they each have a mean of 0 and standard deviation 1. Usually, I would use the standard scaling approach but the method of scaling genes so their expression levels lie between 0 and 1 was more effective in this example as it resulted in a lower validation error.


Supervised or unsupervised

As we know the sampling time associated with each data point, we have a labelled dataset and can approach this as a supervised learning task. This means we are explicitly trying to identify and utilise relationships between gene expression and sampling time to produce a predictive model. The predictive model can be applied to existing and future datasets as long as the fitted pre-processing and feature selection methods are also applied.


Model choice

As the sampling time data we are trying to predict is continuous, a regression model must be used. A problem with predicting the time of sampling is that time operates on a 0-24 cycle where 23.5 hours is one hour away from 0.5 hours.

Most regression loss functions would measure the difference between 23.5 and 0.5 as being larger than it actually is due to their difference in magnitude. It was therefore necessary to create a new loss function using the sine and cosine of the sampling time that would not penalise predictions being on the other side of a 24 hour cycle than the ground truth. The cyclical loss function that we created scores the error of a prediction as the squared angle between the prediction and the target.

The popular deep learning package tensorflow made it easy to define our cyclical loss function so we used a neural network as our supervised model. The neural network model maps the expression level of the selected rhythmic genes to the sampling time with the weights of the model being optimised to minimise the angle that represents the difference between the prediction and target on a unit circle.


Fig5NeuralNetworkClock


Above: Left - neural network model that maps gene expression to the cosine and sine of the sampling time. Right - a 24hr clock representing the possible sampling times and the angles that separate a selection of times.


Validation method

To validate the performance of our time prediction model, we used one dataset for training, one for validation, and one for testing. The training dataset was used for identifying rhythmic genes, fitting the normalisation method, and training the supervised machine learning model.

To optimise the model’s hyperparameters and change the parameters of the gene selection methods, the validation dataset and its predictive error was used. Finally, for estimating how the model would perform on future unseen datasets, we produced predictions on the test dataset.


Evaluating the model's performance

We compared the predicted times with the sampling times across the three datasets, with most of the focus being on the performance on the test set.

To compare the predicted and actual times, we calculated the average difference in minutes across all samples in each dataset. The error was less than one hour for each dataset, which is a smaller duration than the sampling intervals of most time series experiments.

As well as the predictive model being a success, the genes that are used to train the model can be thought of as endogenous time markers in Arabidopsis as they enabled accurate predictions to be made across multiple datasets.


Fig6Predictions


Above: Line plots showing the actual sampling times (blue) and the predicted sampling times (orange).


Future plans

Now that a circadian time prediction method has been created and verified for Arabidopsis thaliana, it could be applied to other crops to identify additional sets of circadian time markers.

As well as other crops, the trained model could be applied to datasets where a stress or environmental variable is introduced to test the effects of these on the circadian clock or, more specifically, the set of biomarkers selected by the model.

This method is being developed by me and Connor Reynolds at the Earlham Institute - in collaboration with partners at IBM - to generalise better to additional unseen datasets. We have started to improve the feature selection method to select a more reliable subset of genes and are experimenting with feature engineering ideas to tackle potential overfitting issues.


About the author

Josh Colmer is a BBSRC funded PhD student on the Norwich Research Park Doctoral Training Partnership (NRPDTP), as part of the Anthony Hall Group, and working in collaboration with Syngenta.